
How to Separate an Image into Layers
To separate an image into layers, upload the flat file to an AI layer separator. It identifies each element, rebuilds it as its own transparent image, and hands the set back as a layered PSD. Photoshop can get you there manually, one selection at a time, but it has no automatic command for it.
You have probably hit this already. A client sends back the hero banner with one note: change the headline. You open the file and it is a 2400 × 1350 JPEG. The headline, the product shot and the gradient behind it are all baked into the same grid of pixels. There is no text layer to edit, because there are no layers at all.
Upload a flat PNG or JPEG and get back real transparent layers. Separate an image into layers → Free at 1K resolution, with the layered PSD, a ZIP of transparent PNGs, and SVG export all included.
Two kinds of layers, and they need different tools
"Layers" means two different things here, and chasing the wrong one costs you an afternoon.
Semantic layers split an image by object: the headline on one layer, the logo on another, the product on a third, the background underneath. This is what you want when you need to move, delete, recolor, or replace a specific element.
Color layers split an image by flat color region: every red area on one layer, every black area on another. This is what you want when the output is physical: vinyl decals, stacked cardstock, screen-print separations.
| Semantic layers | Color layers | |
|---|---|---|
| Splits by | Objects and elements | Flat color regions |
| Typical job | Swap a headline, move a product, reuse a logo | Cut vinyl, stack cardstock, prep screen printing |
| Output you want | PSD or transparent PNGs | SVG cut files |
| Tools | AI layer separation, manual selection in Photoshop | Vectorizers, Cricut Design Space, Illustrator Image Trace |
People search for the second one fairly often. "Separate image into color layers online free" turns up repeatedly in related searches, and almost every result on page one quietly assumes they meant the first. If you are cutting material rather than editing a design, jump to color layers for Cricut.
The fastest way to separate an image into layers
You do this in a browser tab, with nothing to install. Upload the image, let the model decide how many layers it needs, review them, export. Four steps, no selections:
- Upload a PNG or JPEG. A flat export works fine. It does not need transparency to begin with.
- Set the layer count, or leave it on Auto. Auto lets the model decide how many distinct elements the image actually contains, which is usually the right call. Pick a number yourself when you already know you want, say, just foreground and background.
- Review each layer. Every element comes back as a transparent PNG, in its original position and in the original stacking order. Put them back on top of each other and you get the image you started with.
- Export. A layered PSD, a ZIP of transparent PNGs, or SVG, all covered further down.
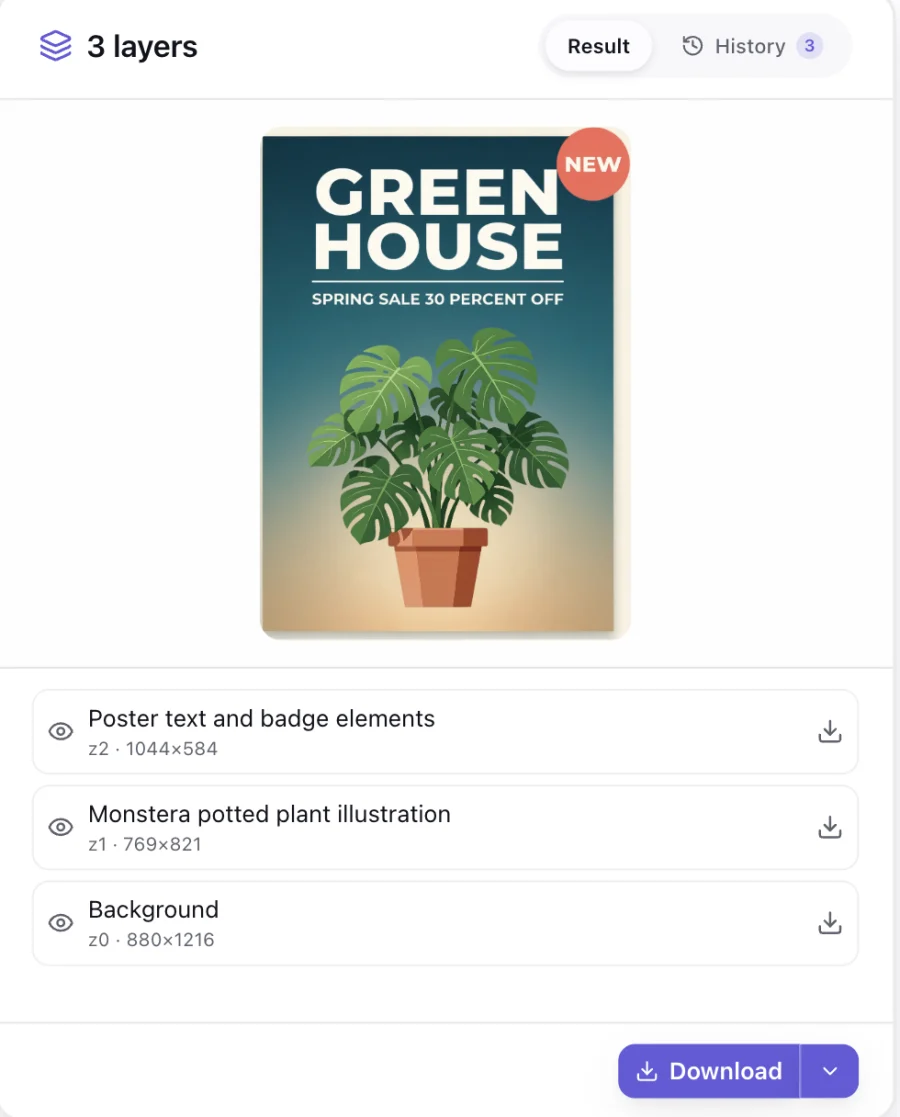
The names in that list are the model's, not placeholders. It labelled the poster's headline and badge as one element, the plant illustration as another, and the gradient behind them as the background, and it recorded where each one sat in the original. That is the part you are checking on this step: not whether the cut-outs look clean, but whether the model grouped the elements the way you need them grouped.
Resolution is the one thing gated behind payment: 1K is free, and 1.5K and 2K are paid tiers. The layer separation itself is identical at every resolution; you are paying for pixels, not for capability.
One trick worth knowing: if a layer comes back holding two things you wanted apart, say a logo and the wordmark beside it, save that layer and run it through again on its own. There is no single button for this, but re-uploading a layer works, and it buys you a second pass on just the part that needs one.
How do I separate an image into layers in Photoshop?
Photoshop has no built-in command that automatically splits a flat image into one layer per object. The real path is manual: make a selection with a tool like Object Selection or Magic Wand, press Ctrl+J (Layer → New → Layer Via Copy) to lift that selection onto its own layer, then repeat for every element in the image.
Which selection tool to use
The selection tool you reach for depends on the edge you are cutting:
- Object Selection — drag a box around an object and Photoshop finds its edges. The fastest option on clean, well-separated subjects.
- Quick Selection — paint over the area and the selection grows to matching edges.
- Magic Wand — clicks a color range. Good for flat graphics, bad for photographs.
- Lasso (and Polygonal, Magnetic) — freehand, for when automatic edge detection keeps guessing wrong.
- Marquee — rectangles and ellipses only, useful for cropping a region out to its own layer.
Ctrl+J copies the selection to a new layer and leaves the original untouched. Ctrl+Shift+J (Layer Via Cut) moves it instead, punching a transparent hole in the layer below. Cut is what you want when you are dismantling an image rather than sampling from it. On macOS, both are Cmd instead of Ctrl. Adobe lists both under Layer in its keyboard shortcut reference.
The Split to Layers script, and why it fails on a flat JPEG
Then there is the script everyone recommends. Split to Layers, published 2012-12-09, puts each group of connected pixels onto its own layer, and it comes up in nearly every Adobe forum thread on this question. The catch that those threads rarely state: it separates pixels that are already separated by transparency. Feed it a flat JPEG, one unbroken rectangle of pixels with nothing transparent between the elements, and it returns a single layer, because by its own logic the whole image is one connected blob. That is why those threads so often end without a resolution.
What gets rebuilt, and what doesn't
The background gets rebuilt. The elements do not. This distinction matters more than anything else on this page, and no one seems to state it plainly.
When the model lifts a product off a poster, something has to exist where the product used to be. So it reconstructs the area behind it, and you get a clean background plate you can reuse. The gradient continues, the pattern carries on, the shadow is gone.
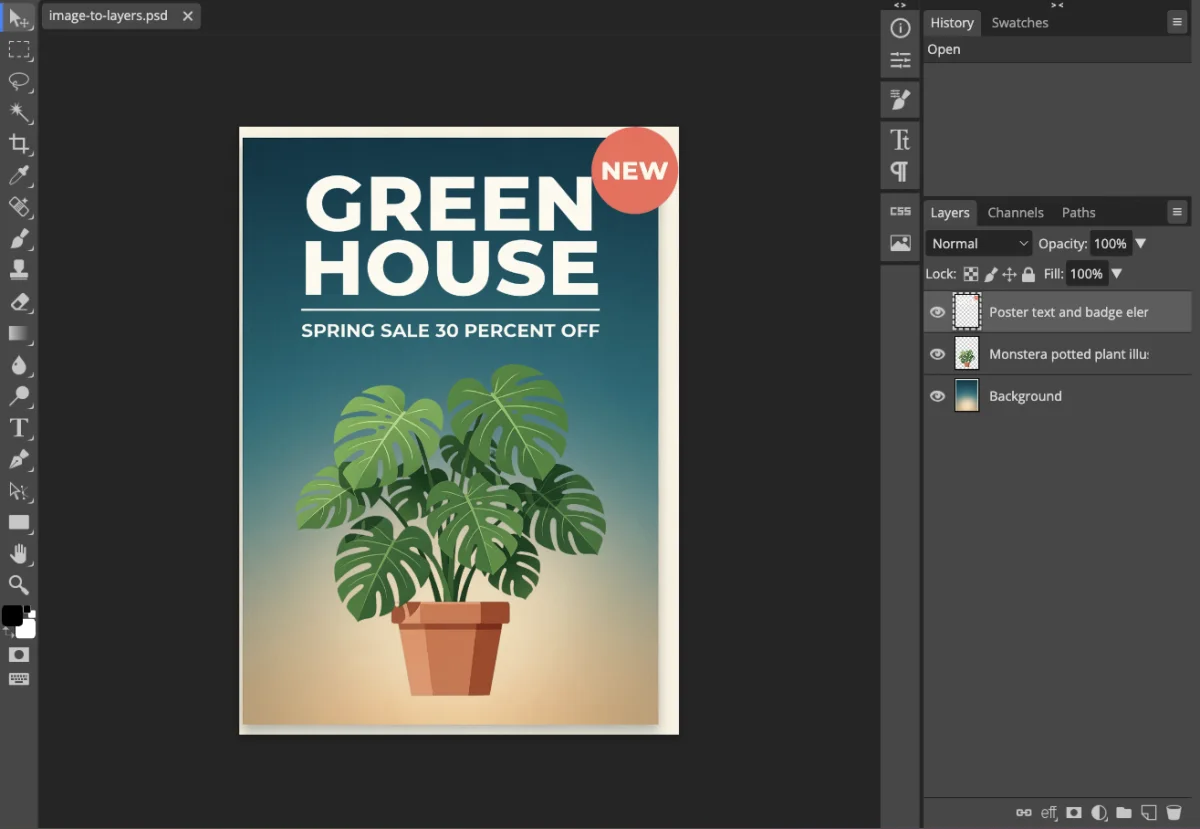
That screenshot is the exported file opened in Photopea, untouched. The three layers arrive under the names the model gave them, in the order it detected them, each one still sitting where it sat in the original poster.
An element that was partly hidden behaves differently. A mug sitting behind a laptop comes back as the visible crescent of a mug. The occluded part is not restored, because it was never in the image. The layer is cut at the boundary of what the camera could see.
Two of the better-known tools in this category advertise that they "reconstruct hidden areas." Read them closely and the object of that sentence is always the background, the same capability described optimistically.
In practice:
- Works: delete the foreground to expose a clean, complete backdrop.
- Does not work: pulling a half-occluded object out for use as standalone stock art.
Images that don't separate cleanly
Four categories give every tool in this space trouble:
- Heavy mutual overlap. A crowded flat-lay where six objects cross each other produces fragments, not objects.
- Soft edges. Flyaway hair, fur, smoke, motion blur, and glass have no boundary to find. Expect halos.
- Low contrast within one color family. A grey product on a grey background often comes back merged into one layer.
- Photographs you intend to vectorize. See the SVG note below. This one is a format problem, not a separation problem.
How do I export individual layers?
Three formats, and they are not interchangeable.
| Format | What you get | Best for | Not for |
|---|---|---|---|
| PSD | One document, every layer named and positioned | Continuing the edit in a real editor | Handing to someone without an image editor |
| ZIP of PNGs | One transparent PNG per layer | Compositing in Figma, After Effects, a web build | Anything needing the original stacking order preserved automatically |
| SVG | Vector paths traced from the layers | Logos, icons, flat graphics, cut files | Photographs |
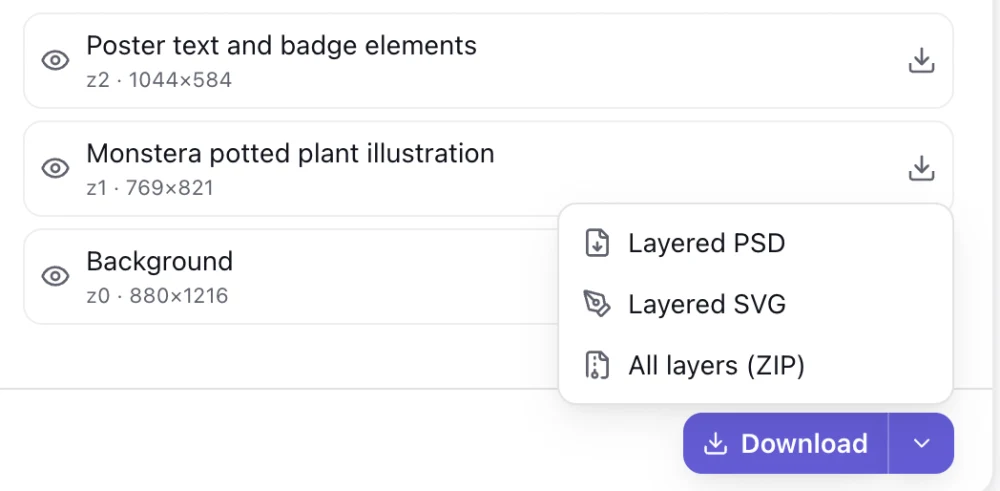
The PSD keeps the original canvas dimensions, names each layer, preserves position, size, and visibility state, and writes the stacking order bottom to top, so the file opens the way you left it. Photoshop, Photopea, Affinity Photo, and GIMP all read it. Photopea matters here if you do not own Photoshop: it runs in a browser tab, it is free, and it opens the exported PSD with the layer structure intact.
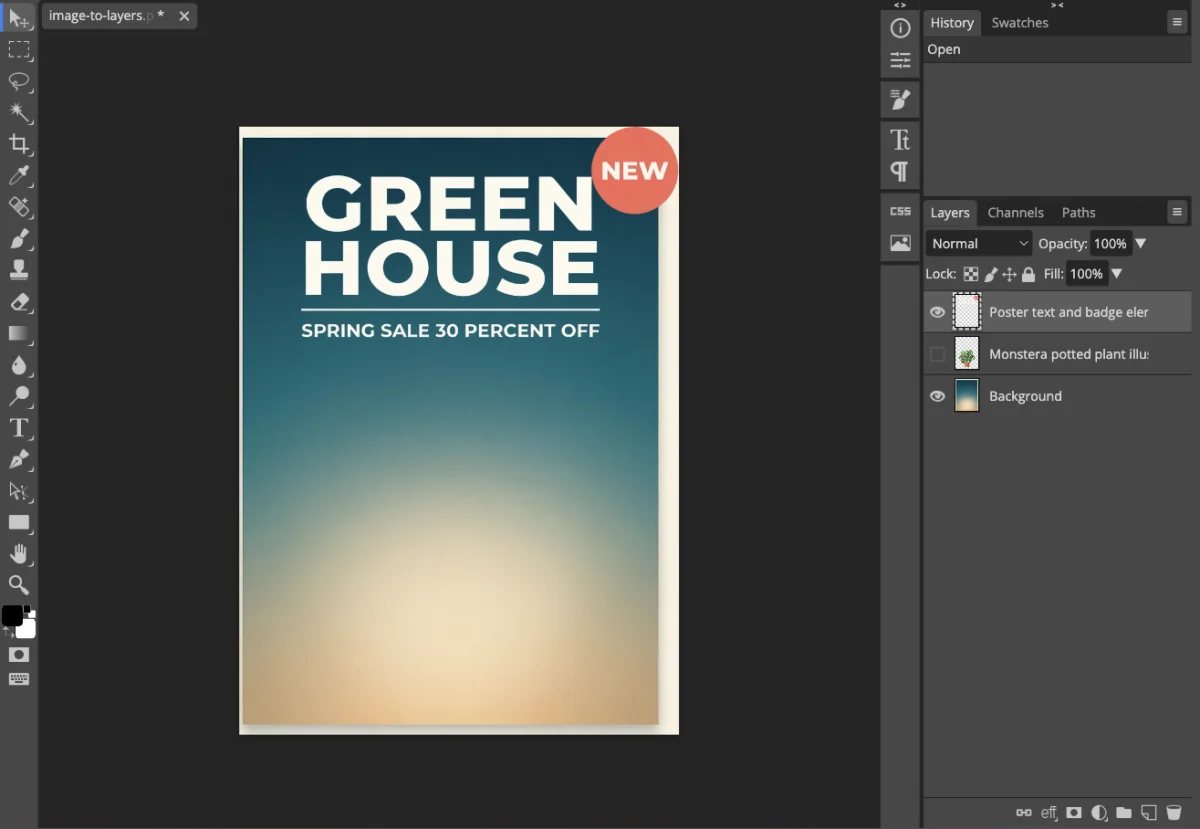
That is the same file with one layer's eye switched off in Photopea. The plant is gone and the gradient behind it is continuous, because the background was rebuilt rather than cut around.
The SVG export has a real boundary and it is worth being blunt about it. Vectorization groups the image into flat regions of color and traces the edge of each one, so it does well on logos, icons, and illustrations, and badly on photographs. A cut file has no concept of a gradient, so every smooth transition has to become a hard edge somewhere.
Use SVG when the source is already graphic. Use the PNG or PSD when it is photographic. The Cricut section below shows what that looks like when you ignore the rule.
What can you actually do once the layers are separated?
Almost every tool in this category stops at the download button. Here is what the layers are actually for, and what to do first in each case.
Change the words. Hide the text layer, set live type on top of the background plate, match the font. This is the one people come for, and it only works because the background underneath the text was rebuilt rather than left with a hole in it.
Move or resize one element. Drag the product shot, scale it, and the gradient behind it stays intact. If you scale a layer up past its own pixel dimensions you will see it soften, which is why the layer list shows you those dimensions before you commit.
Recolor a single element. Clip an adjustment layer to one layer instead of masking by hand on a flat image.
Reformat for another placement. A square post becomes a wide banner by repositioning three layers, instead of regenerating the whole image and getting a different-looking product.
Animate. Separate layers are what a parallax scroll, a Lottie file, or an After Effects composition needs. Import the ZIP of transparent PNGs and each one arrives as its own footage item.
A practical first move in any editor: rename nothing, but do check the stacking order before you start. The export writes layers bottom to top in the order the model detected them, and if two elements overlapped in the original, the one in front is the one you want on top.
Is there a free way to separate an image into layers?
Yes, and which one is right depends on how many images you have, not on which tool is best.
One image, today. IntoLayers separates it free at 1K resolution, and the free tier includes every export format: the layered PSD, the ZIP of transparent PNGs, and SVG. Nothing about the separation itself changes when you pay. You are buying output pixels, not capability, so the free result is the paid result at a smaller size.
One image, and it has to be print-size. No free AI route gets you there. Do it by hand in Photopea, which is free and runs in a browser tab, using the same Ctrl+J loop described above, at whatever resolution your source file already is.
Enough images that the work repeats. Qwen-Image-Layered is Apache 2.0 and the weights are public, so the ceiling is your own hardware rather than anyone's pricing page. That is a Python environment and a graphics card, not an afternoon.
If you are cutting material rather than editing a design, importing a layered SVG into Cricut Design Space has always been free. The paywall there is on generating the layers, not on using them.
Separating an image into color layers for Cricut
Cricut Design Space has this built in, and the most-linked Cricut tutorial on this topic does not mention it.
The feature is Convert to Layers, and as of 2026-09-12 it splits an uploaded image into up to nine color layers, with two modes: Stacked, which keeps layers overlapping for layered decals, and Sliced, which butts them edge to edge so the pieces fit together like a mosaic. It is part of a Cricut Access subscription. Cricut moves features across that paywall periodically, so check your own account rather than trusting any tutorial's date, including this one.
Importing a ready-made layered SVG has always been free, and that is the way around the paywall: separate the image elsewhere, export SVG, upload the SVG to Design Space. Our image to layers for Cricut page walks through that path specifically.
One detail worth planning around, and one that no tutorial on this topic seems to state: Design Space is a desktop install. Checked on 2026-09-12, design.cricut.com hands you the Mac or Windows application rather than a canvas in the tab. Whichever of the two routes above you take, the Cricut half of the job happens in an app on your own machine.
The separation half does not have to. Tracing an image into a layered SVG runs in a browser tab, so that part works from any machine you happen to be sitting at, including one you are not allowed to install software on. You only need Design Space open at the point where you actually cut.
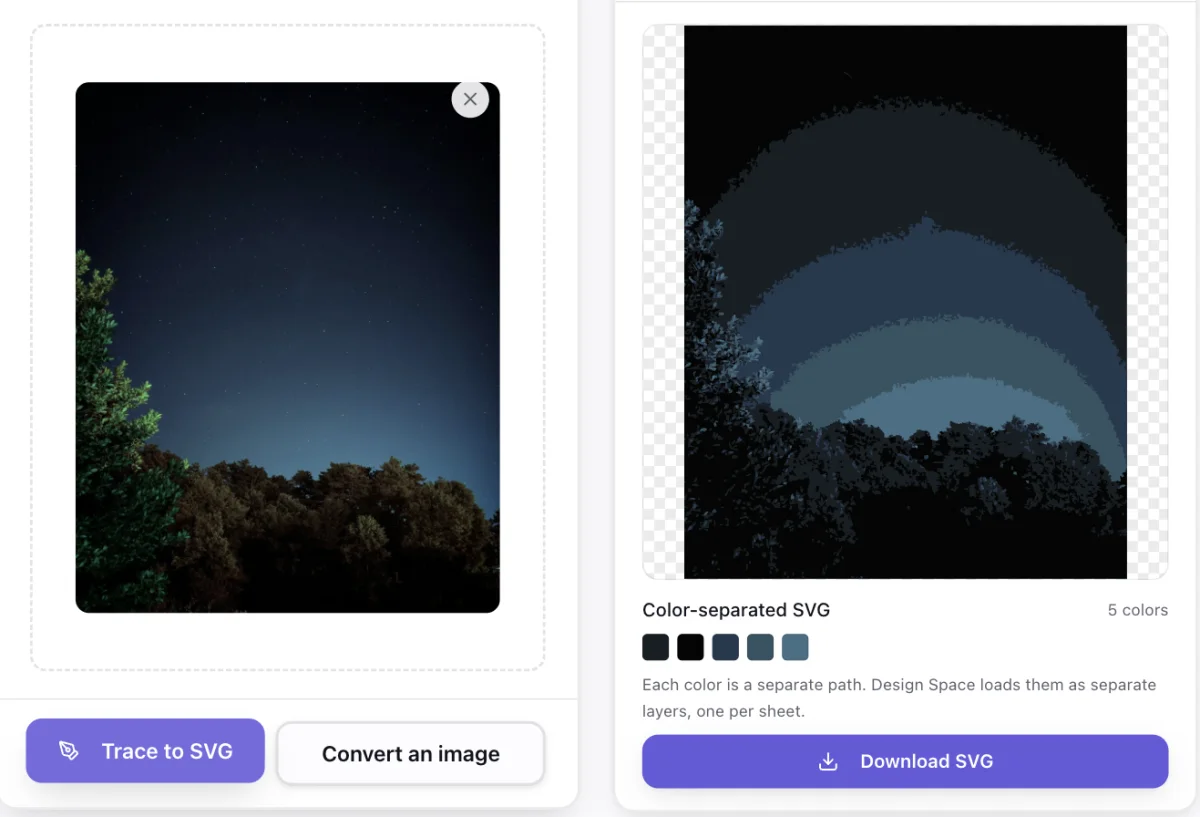
That is our own tracer, on a photograph, with nothing rigged. The sky in the original runs smoothly from near-black to pale blue. Traced, it becomes five stacked bands with visible steps between them, and the foliage turns into noise. Nothing is broken; the format simply cannot hold what the photograph contains. The panel on the right is counting the colors for you, and five colors means five sheets of material. That is the honest test for whether an image belongs on a cutting machine at all.
On the desktop side, Adobe Illustrator's Image Trace does the equivalent job: trace the image, expand it, then release the resulting group to layers. It gives you more control over path simplification than any browser tool, and it costs a Creative Cloud subscription.
Which tool should you use?
It depends on two things: whether you need semantic or color layers, and how much manual work you are willing to trade away to avoid paying. The table below sorts by both. First, though, one thing worth knowing about the category: most of these AI tools appeared within a few months of each other, and there is a reason for that.
In December 2025, Alibaba's Qwen team released Qwen-Image-Layered, a model that decomposes a single RGB image into multiple semantically separated RGBA layers. It is documented in arXiv:2512.15603 (submitted 17 December 2025) and published on GitHub under the Apache 2.0 licence. One detail from the paper is quietly telling: to train it, the team built a pipeline that extracted and annotated multi-layer images from Photoshop PSD files. The model learned layer structure from actual designers' working files.
Because the licence is permissive, anyone could wrap it in a web page, and several tools now ranking for this query state outright that they run it. IntoLayers runs a different model of the same class, so the comparison below is about the product around the model, not the model alone.
| Tool | Layer type | Free tier | Export |
|---|---|---|---|
| IntoLayers | Semantic | Yes, at 1K | PSD, PNG ZIP, SVG |
| Photoshop (manual) | Semantic | No | PSD |
| Photopea (manual) | Semantic | Yes | PSD, PNG |
| GIMP (manual) | Semantic | Yes | XCF, PNG |
| Canva Magic Layers | Semantic | Disputed — see below | Canva design |
| Cricut Design Space | Color | Convert to Layers needs Access | Cut files |
| RunDiffusion Image to Layers | Semantic | Check current terms | PNG |
| Qwen-Image-Layered | Semantic | Open weights, self-hosted | RGBA PNG |
One honest note on Canva. Published guides flatly contradict each other about whether Magic Layers requires a Pro subscription or is free to everyone during its rollout. We tried to settle it against Canva's own documentation on 2026-09-12 and could not. Their help centre blocks automated access, and Canva has a history of moving features across that line without announcement. So rather than repeat either claim: open the feature in your own editor and look for the crown badge. That is the only answer that will still be correct next month.
Frequently Asked Questions
How do I separate an image into different layers in Photoshop?
Select an element with the Object Selection, Quick Selection, Magic Wand, or Lasso tool, then press Ctrl+J on Windows or Cmd+J on macOS to copy that selection onto its own layer. Use Ctrl+Shift+J instead if you want to cut the element out of the original rather than copy it. Repeat for every element. Photoshop has no automatic command that splits an entire flat image into per-object layers in one action, which is why this is a manual, element-by-element process.
What does Ctrl+L do in Photoshop?
Ctrl+L opens the Levels dialog, which adjusts tonal range and contrast. It has nothing to do with layers, despite the L. This mix-up is common enough that it shows up in Google's own suggested questions about splitting images into layers. The shortcut you actually want for layers is Ctrl+J, which copies the current selection to a new layer.
How can I separate a PNG image into separate layers?
Exactly the same way as a JPEG. A PNG that already has transparency between its elements can be split in Photoshop with the third-party Split to Layers script, which puts each group of connected pixels onto its own layer. A flat PNG with no transparency needs either manual selections or an AI layer separator, because there is no transparency for a connected-pixel script to work from.
How do I separate an image into layers on Cricut?
Upload the image to Cricut Design Space and use Convert to Layers, which splits it into up to nine color layers in either Stacked or Sliced mode. This is a Cricut Access feature as of 2026-09-12. If you are not subscribed, separate the image into color layers elsewhere, export it as an SVG, and upload that SVG to Design Space. Importing a layered SVG has always been free.
Which AI can separate an image into layers?
Several will, and most of them are built on the same open-source foundation: Qwen-Image-Layered, released under Apache 2.0 in December 2025. What differs is the product around it: resolution limits, export formats, and how much you get for free. IntoLayers separates images into transparent layers free at 1K resolution and exports a layered PSD, a ZIP of transparent PNGs, or SVG, with 1.5K and 2K available on paid plans. For occasional one-off jobs, manual selections in the free browser editor Photopea will also get you there without any AI at all.