
For animators
Separate an Image Into Layers for Animation: What Splits Cleanly and What Needs Repainting
To separate an image into layers for animation, IntoLayers splits it into a rebuilt background plus one transparent layer per element and exports a layered PSD that After Effects can import as a composition. On our test character, five layers gave the bike, the body, the bag and the helmet — whole pieces, not separate limbs.
Parts that were hidden behind another element come back redrawn, one hand came back in a different pose, and the bag gained a second strap. Below is the whole run: what split cleanly, what needs repainting, and how the file goes into After Effects.
Only upload artwork you have the right to edit — your own characters, or art a client owns or has licensed.
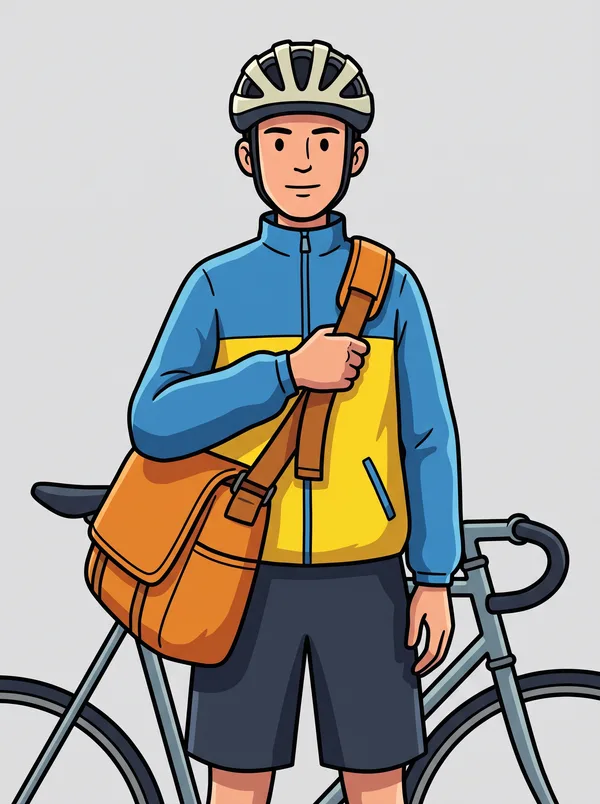
The flat character art
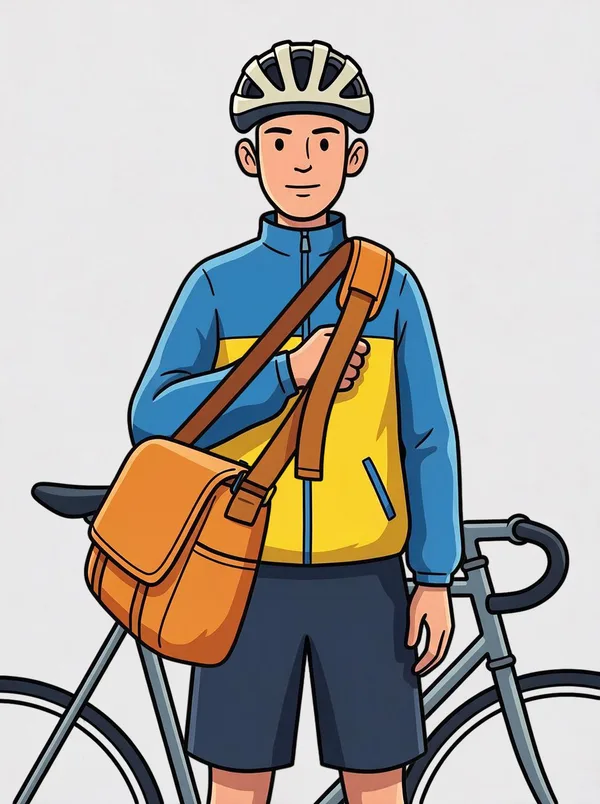
The five layers stacked back together
Can AI split an image into layers, or do you mask it by hand in Photoshop?
AI can split an image into layers, but everything it draws behind another element is a guess. By hand in Photoshop, you select each element, mask it onto its own layer and paint in what was behind it. IntoLayers does the selecting, masking and filling in one run and gives you a layered PSD to keep working on in Photoshop or After Effects.
What changes is what you check. A hand-made mask is as accurate as you made it; a split layer is the model's reading of the drawing. On our courier, that reading turned a gripping hand into a fist — the sections below show where to look.
How do you separate an image into layers for animation?
Upload the art, pick how many layers, check the hidden parts, then download.
- Upload a PNG or JPEG of the character or scene.
- Pick three or more layers — at two you get the background plus a single element layer.
- Check the parts that were hidden or interlocked on each layer.
- Download the layered PSD for After Effects, or single PNGs for layers you will scale up.
What do you get when you split a character into layers?
One layer per element the model finds, each named, in stacking order and in place on the canvas — plus the rebuilt background. At five layers this courier came apart into four pieces: the bike, the body, the bag with its strap, and the helmet.
The pieces follow objects, not joints. The body came back as one layer from head to shorts; arms and legs were not split off. Plan to cut limbs yourself before you rig.
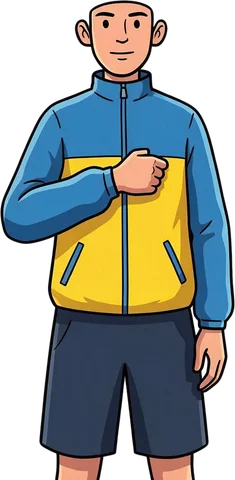
Cyclist Character
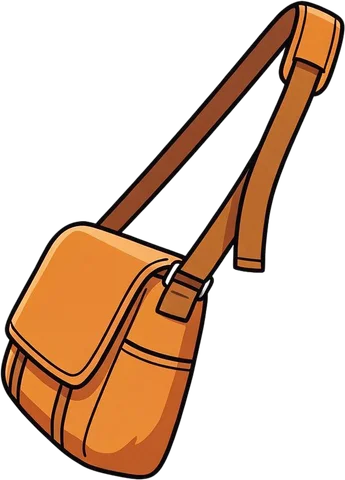
Orange Messenger Bag
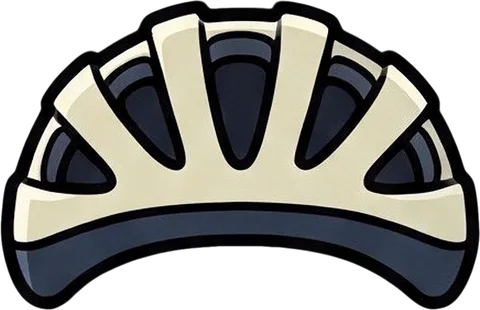
Cycling Helmet
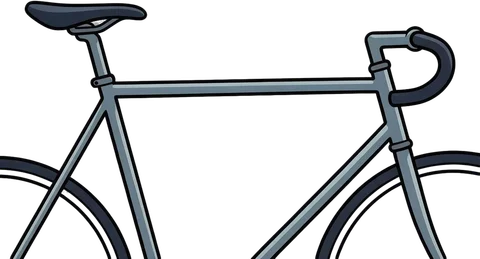
Road Bicycle
What happens to the parts that were hidden?
Whatever sat behind another element is a guess, never a recovery — and whether it is drawn at all varies.
On this courier, the chest under the bag strap, the top of the head under the helmet and the bike frame behind the rider were all drawn in. On a simple shape in an earlier test, the layer stopped at the edge you could see, in 3 of 3 runs.
So before you animate a part moving away from what covered it, look at what is underneath. It may be plausible, it may be missing, and it is never the artist's original drawing.
Which character art splits cleanly, and which needs repainting?
From this run, the line falls between parts that sit on top of each other and parts that interlock.
Came apart cleanly
- Separate objects with a clear outline: the helmet, the bag, the bike.
- A figure standing in front of a background — the background is rebuilt behind it.
- Flat colour and bold outlines, as in most cel-shaded character art.
Needs repainting or checking
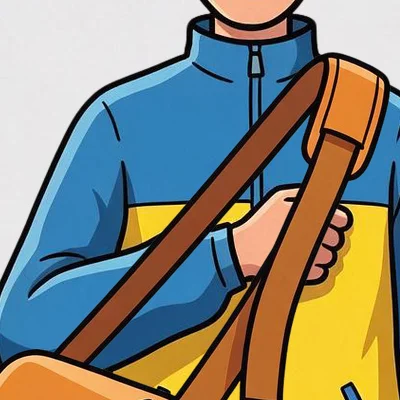
- Anything that interlocks, like a hand gripping a strap. One stacking order cannot put the hand both over and under the strap, so the hand was redrawn as a fist behind it — and the strap was redrawn too.
- Hidden areas you will reveal in motion — they are drawn in by guesswork, or not at all.
- Separate limbs. Arms and legs stayed attached to the body.
- Anything cropped by the frame. The wheels and legs that ran off the edge of the art are still cut off on their layers.
Does the stack still match the original when you put it back together?
Not exactly. Every layer lands in its original position and from a distance it reads as the same drawing, but where parts interlocked, the layers were redrawn to fit one stacking order.
In the drawing, the hand grips the single bag strap. On the body layer, the hand is a closed fist with nothing in it. The bag layer came back with two straps, and because the bag sits above the body in the stack, both now cross in front of the fist. That is a repaint before the arm can move.
Original
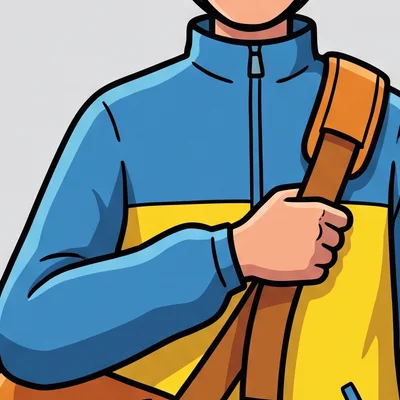
Body layer
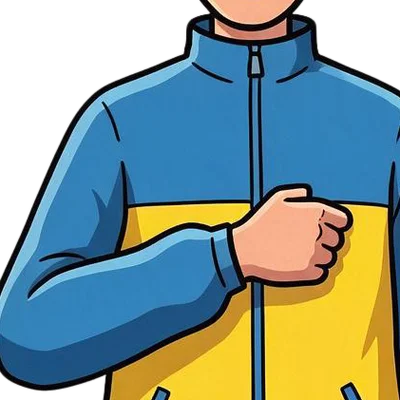
Stacked back
How do you import the layers into After Effects?
Download the PSD and import it as a composition. Adobe's After Effects help documents the options; these are the steps, with what our file brings to each. The same PSD opens in Photoshop if you want to cut limbs apart before import.
- 1
Split the image and download the PSD
Pick three or more layers so each element gets a layer of its own, then download the layered PSD. The PSD is RGB, which After Effects needs to keep the layers separate.
- 2
Choose File > Import > File
Select the PSD in After Effects.
- 3
Import as Composition – Retain Layer Sizes
Each layer keeps its own size, so its anchor point starts at the centre of that element rather than the centre of the frame. Choosing plain Composition makes every layer the size of the frame instead.
- 4
Move each anchor point to its pivot
An element's centre is rarely where it should turn. Put the anchor at the joint — the shoulder, the axle — before you animate rotation.
- 5
If it came in as one flat image
Importing as Footage merges the layers. Select the item and choose File > Replace Footage > With Layered Comp to get them back.
Layer names and stacking order come across from the PSD, so the Timeline shows Road Bicycle, Cyclist Character, Orange Messenger Bag and Cycling Helmet in the order they were drawn.
Can you use the layers for parallax and camera moves?
Yes — the background comes back rebuilt behind the figure, so the figure can slide across it. Check two things first.
What was drawn in behind the figure is a guess. And anything cropped by the frame stays cropped: on our courier, the wheels and legs are still cut off at the edge, so the camera cannot pan past them.
Can you scale a layer up for a push-in?
Use the PNGs for that, not the PSD. Split into three or more layers, element layers come back larger than they sit in the image — a median of 2.17× in our 15-run accuracy test at 1K — and smaller elements are enlarged more.
The PSD places every layer at the size it occupies on the canvas, so the extra pixels are not in it. Download the layer you will push in on as a transparent PNG and swap it into the composition.
A two-layer run returns layers at their original size. The enlargement only shows up at three layers or more.
What does it cost, and how long does it take?
You pay per layer: 5 credits at 1K, 8 at 1.5K and 10 at 2K. This courier at five layers is 25 credits at 1K, and the run took 67 seconds.
Three layers or more need a paid plan or a credit pack. Starter includes 1,200 credits a month — 48 five-layer runs at 1K. Your first run without an account is one 1K conversion with 2 layers: the background plus a single element layer, which on a character image is not enough to animate. See plans and credit packs.
What won't it do?
It hands you separated artwork. The animation prep after that is still yours.
It does not rig
No bones, no pivots, no limbs split at the joints, and no mesh for Live2D or Spine. Plan to cut and set those up yourself.
It does not recover hidden art
Covered areas are guessed or left out. It rebuilds an editable approximation; it does not recover the original file or its layers.
It can change a pose
Where parts interlock, the model redraws them to fit one stacking order. Here a gripping hand became a fist and the bag gained a second strap.
Everything is raster
Layers are transparent PNGs, not vector shapes. For vector animation, trace the layers or redraw them.
Split one of your characters
Upload a PNG or JPEG, pick three or more layers, and check the hidden areas before you start keying.